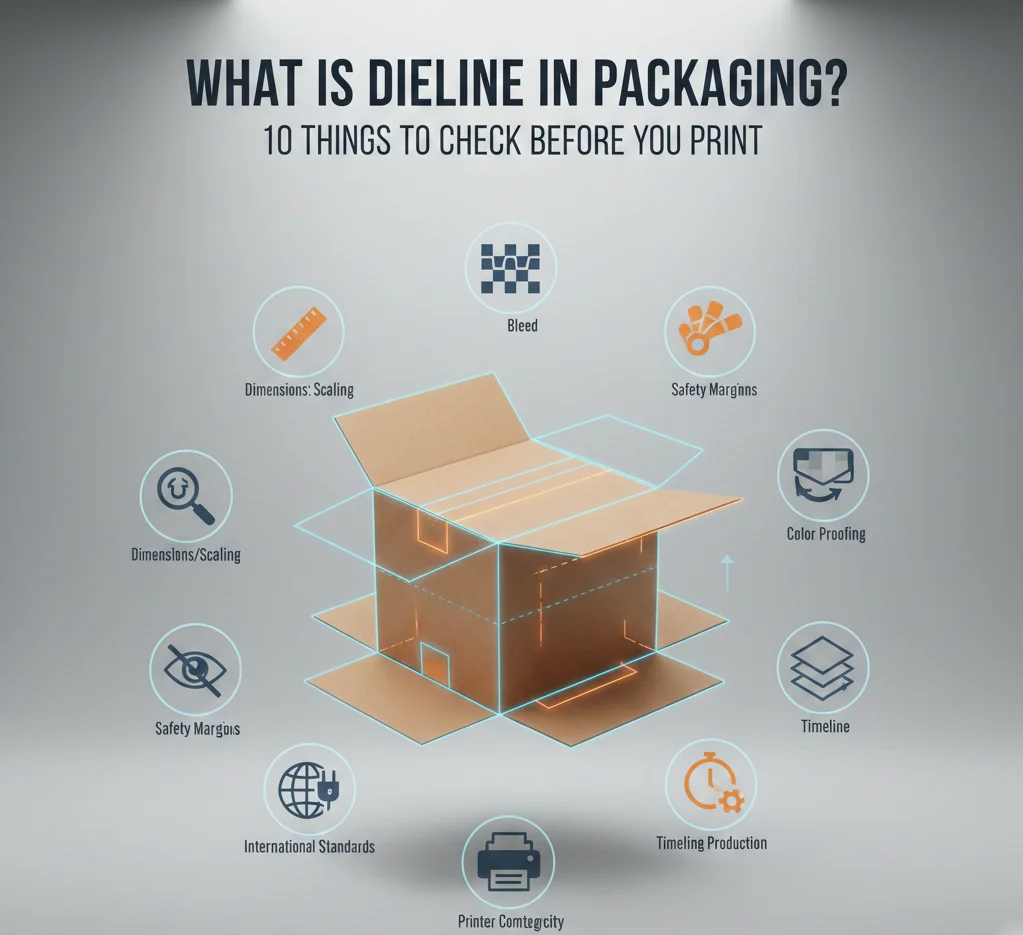
To guarantee that artwork and structure match correctly during manufacture, knowing What Is Dieline in Packaging is essential. It is the flat blueprint for a package that displays cut lines, fold lines, bleeds, and safe zones. Packaging mistakes in the U.S. cost companies millions in reprints and delays, therefore a proper dieline saves money and time.
In 2024 the U.S. packaging industry will be worth about USD 197.18 billion, therefore brands lose time and money when packaging needs reprints or fixes, thus a proper dieline is important for cost and speed. Cut, fold, and glue according to the dieline early so that the completed box or label resembles the mockup and arrives on time.
Understand What Is Dieline in Packaging Before You Print Anything
A dieline shows the printer precisely where to cut, fold, and attach a package. It is useful so the finished box or label looks just perfect. Designers make the dieline before adding artwork to stop logos and text from crossing a crease or being removed. Cutting reprints and delays, a correct dieline saves time and money.
Dielines help factories check machine installation and design compliance to the desired material. Always ask the printer for a factory dieline for your Ecommerce Packaging before finalizing artwork so the finished product aligns with the mockup.
1. Goal of a dieline

A dieline helps to guarantee that the design is free from expensive errors by directing all of the production process. Designers position text and images with the dieline as the map so folded panels line up. Printers align cutting and creasing instruments with the dieline to make the package folds and shuts as intended.
Estimating waste and material usage, which influences sustainability and cost, also benefits the dieline. The brand avoids reprints and postponements that compromise launch plans and budgets when the dieline corresponds with the artwork.
- Shows cut lines so the printer knows where to trim.
- Marks fold lines so panels fold cleanly.
- Defines glue areas so the corrugated, cardboard, Kraft or rigid box holds together.
- Sets bleed and safe zones to protect artwork.
- Helps estimate material use to reduce waste.
2. What a dieline includes
A clear dieline lists every mark the factory needs to make custom boxes. The file shows cut paths, crease lines, and glue tabs so the factory can assemble the piece. The dieline also shows where to place registration marks and color bars for print checks.
The file specifies the material type and thickness allowing the manufacturer to select suitable equipment. Designers cut and folded lines on separate layers so that installers could flip them on or off. This transparency speeds proofing and reduces producer back-and-forth.
- Cut paths for trimming the shape.
- Crease lines for folding panels.
- Glue tabs for assembly.
- Bleed area to extend backgrounds.
- Safe zone to protect text and logos.
3. Tools to make dielines
Designers use simple and advanced tools to make dielines that match factory needs and to answer What Is Dieline in Packaging for each job. Vector programs like Adobe Illustrator let designers draw precise cut and fold lines that stay sharp at any size.
Structural CAD tools such as ArtiosCAD handle complex shapes and heavy board designs with exact measurements. Many printers supply a factory dieline in PDF or AI format so the art team can place graphics exactly.
- Adobe Illustrator for vector dielines.
- ArtiosCAD for structural design.
- PDF templates from printers for exact specs.
- Vector files keep lines crisp and editable.
- Separate layers for cut, fold, and print marks.
4. How designers use dielines
Designers place artwork on the dieline so each panel lines up when the package folds. Print paper mockups and fold them to test how the final piece will look and feel. Share dielines with the factory to confirm material and finishing options.
This hands-on testing catches layout problems before the press run and keeps the project on schedule.
- Place art on panels to match structure.
- Check logos and text against safe zones.
- Print paper mockups to test folds.
- Share dielines with factories for confirmation.
- Adjust art after mockup testing.
5. Common dieline mistakes
Many production problems start with small dieline errors that grow into big costs and show why What Is Dieline in Packaging matters. Designers sometimes place text too close to the edge, which the printer trims off and ruins the look. Using the wrong dieline version misaligns panels and causes reprints.
Missing bleed or wrong dimensions also lead to visible white edges or miscuts. Double-check dieline versions and proof every panel to avoid these costly errors.
- Text too close to edge risks trimming.
- Wrong dieline version causes misalignment.
- Missing bleed shows white edges after trim.
- Incorrect dimensions lead to miscuts.
- No mockup increases the chance of errors.
6. Dieline for different materials
Different materials need different dieline details because each material behaves in its own way. Cardboard and corrugated board need larger glue tabs and stronger creases to hold shape and weight. Thin label stock needs precise cut paths and tight tolerances so the label peels and sticks cleanly.
Flexible pouches require special seals and notches that the dieline must show for proper sealing and opening. Designers must note material type and thickness on the dieline so the factory can set the right tools and tolerances.
- Cardboard needs strong glue tabs and clear creases.
- Corrugated boards to design Custom Corrugated Boxes need larger tolerances for cuts.
- Label stock needs precise cut paths and tight tolerances.
- Flexible pouches need seal lines and tear notches.
- Material notes on dieline guide factory setup.
7. Proofing with dielines
Proofing catches layout and fit issues before the press run and saves money. Designers print a full-size paper mockup from the dieline and fold it to check panel alignment and how the art meets edges. The mockup shows where images meet at edges and whether text sits in safe zones.
Factories also run digital proofs to check color and registration so the final print matches the design. Both paper mockups and digital proofs help confirm that the dieline and artwork match the final product.
- Print full-size mockups to test folds.
- Fold and assemble to check alignment.
- Run digital proofs for color and registration.
- Compare mockup to dieline for accuracy.
- Fix issues before the press run.
8. Communicating with manufacturers

Clear communication prevents costly mistakes and keeps production on time. Send the dieline of your Custom Luxury Cake Boxes with notes about material, finish, and glue type so the factory can set up correctly. Ask the factory to confirm the dieline and to return a factory-approved version if changes occur.
Keep cut, fold, and print layers separate so the factory can use them easily during setup. A short checklist with dieline files speeds up setup and reduces the chance of misinterpretation.
- Send dieline with material notes for clarity.
- Ask for factory confirmation of the dieline.
- Keep layers separate for cut, fold, and print.
- Include finish and glue details in the file.
- Use a checklist to speed setup.
9. Dieline and sustainability
Smart dieline design benefits the earth by reducing expenses and waste. Tight dines nest on a sheet saves material and lowers scrap, hence less wood and fewer trees are used. Designers can arrange panels to fit more units per sheet or to consume less board, therefore reducing carbon footprint and shipping weight.
The dieline also points where recycled or mono-materials can be utilized to simplify end-of-life recycling. Many times, factories provide direction on designs that improve output and lower trash.
- Tight nesting reduces scrap and saves material.
- Plan panels to fit more units per sheet.
- Use mono-materials to ease recycling.
- Note recycled content on dieline for factories.
- Ask the factory for waste-saving layout tips.
10. When to get a dieline
Early in the design process, obtain the dieline so the art team may work to the right form and scale. Before finishing the artwork, get a factory dieline from the printer so the design matches the desired material and machine. Designers should not complete art until the dieline matches the selected material and finish to prevent last-minute alterations.
Early dieline approval speeds proofing and so helps to avoid delays that push back launch dates. Regard the dieline as the project master plan and update it every time the material or construction alters.
- Request factory dieline early in the project.
- Hold final art until dieline matches the material.
- Update dieline when structure or material changes.
- Use dieline as blueprint for proofs and setup.
- Confirm dieline before ordering the press run.
What Is Dieline in Packaging | A Short but Complete Summary
|
Dieline Checklist |
Purpose |
Key elements |
Action / Checklist |
|---|---|---|---|
|
Goal of a dieline |
Prevent costly errors; guide production |
Cut lines; fold lines; glue areas; bleed/safe zones |
Confirm dieline matches artwork |
|
What a dieline includes |
Specify factory marks and materials |
Cut paths; crease lines; glue tabs; registration marks |
Provide layered file with material notes |
|
Tools to make dielines |
Create precise, editable templates |
Adobe Illustrator; ArtiosCAD; PDF templates |
Use vector files; separate layers |
|
How designers use dielines |
Align art to structure; test fit |
Panel placement; mockups; factory checks |
Print mockup; adjust art after test |
|
Common dieline mistakes |
Avoid reprints and miscuts |
Text too close; wrong version; missing bleed |
Proof versions; check dimensions |
|
Dieline for different materials |
Match construction to material behavior |
Glue tab size; crease strength; seal lines |
Note material/thickness on dieline |
|
Proofing with dielines |
Catch fit and color issues early |
Full-size mockups; digital proofs; registration |
Fold mockup; run color/registration checks |
|
Communicating with manufacturers |
Ensure correct setup and approval |
Material notes; finish; glue type; layers |
Send dieline; request factory confirmation |
|
Dieline and sustainability |
Reduce waste and improve recyclability |
Tight nesting; mono-materials; recycled content |
Optimize layout; note recycled content |
|
When to get a dieline |
Lock form before final art; avoid delays |
Factory dieline; material-specific specs |
Request early; update with any changes |

Call Packaging Company to Get Your Dieline Right
Learn What Is Dieline in Packaging and get a factory-approved dieline. You should do it before any print run to avoid costly errors and delays. Ask the printer for their dieline, print a mockup, and confirm all specs before final art. Contact Packaging Company to review the dieline and start a smooth production run.
FAQs
What is a dieline vs. template?
A dieline displays the cut and fold lines of the container so the factory may shape it. So the art team may correctly position images and text, a template offers artwork arrangement and design advice.
How much bleed is needed?
Most printers ask for 1/8 inch (3 mm) bleed so the press can trim without leaving white edges. Some jobs need 5 mm for heavy trim or tight tolerances, so always check the printer’s specs before final art.
- 3 mm common for labels and boxes.
- 5 mm for heavy trim or tight tolerances.
- Ask the printer for exact bleed needs.
- Add bleed to all edges that will trim.
- Extend backgrounds into the bleed area.
Can dielines change after proof?
Yes, designers often update dielines after mockups and proofs to fix fit or alignment issues. Factories may return a revised dieline that matches machine setup, and designers must update artwork to match that final dieline.
Do printers need layers in dieline files?
Yes! printers prefer separate layers for cut, fold, and print marks so setup moves faster and errors drop. Separate layers let the factory hide or show marks as needed during machine setup.
How to avoid misprints?
Follow a clear checklist and proof carefully to avoid costly mistakes. Use safe zones, add bleed, send vector dielines, print mockups, and confirm specs with the factory before the press run.
- Use safe zones for text and logos.
- Add bleed to all trimmed edges.
- Send vector dieline files.
- Print and fold mockups.
- Confirm specs with the printer.
- Approve factory dieline before press.